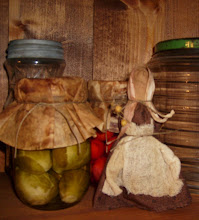


Greetings everyone! Hope you are all having a blessed Sunday. The weather here in Ky is awesome. It's 68 degrees out now. Today I am going to be sharing with you how to make grubby pantry jars. Please feel free to leave me a message if you have any questions. I love talking with you guys and meeting everyone.
SUPPLIES NEEDED:
Clean spagettii jar or other glass jar; label removed
Spices
Large Deep Bowl
Mod Podge
Brushes
Homespun
Twine
Printed Label that has been stained
Ok folks once again if you have a nice manicure please wear gloves. Unless you are a country girl like me who keeps paint, spices and wax on hands and nails at all times! Let's begin by gluing are stained label onto the glass jar using the mod podge. Allow this to dry for a few minitues. While this is drying grab a large deep bowl and mix your spices in it. It's best to start with about 3 cups of spices, I used allspice and cloves. Use a container with a lid to save the spices that are left, or a zip bag is fine too. Now we can move on to brushing mod podge all over the jar with the exception of the rim. It's best to hold onto the jar by the rim and spin it around; doing the bottom last. DO NOT apply glue to your label only around the edge and slightly onto the label as much as you'd like. Take your jar and roll it around in the spices taking your hand and pressing and tamping the spices on gently. Once you have the jar covered set it upside down to dry. This may take awhile depending on the weather, room temp and so on. When you can touch it without removing alot of spices repeat the about process. Set it upside down and allow to dry for a couple of hours until its rock hard. After the jar has cured brush on one final coat of mod podge; this time go over the label too. DO NOT roll the jar in spices again. Allow to dry. To add the finishing touches rip a piece of stained muslin or homespun to fit the top of the jar and tie tightly with twine. You now have a wonderful early looking pantry jar!
God Bless,
Jill
Psalm 1:3And he shall be like a tree planted by the rivers of water, that bringeth forth his fruit in his season; his leaf also shall not wither; and whatsoever he doeth shall prosper.
5 comments:
Jill,
It looks so wonderful. You are so talented! Thank you for sharing.
Sharon
Your blog is very informative. BUT, I must tell you that I probably won't read it as often as I'd like to because the black background is just tortureous on my old middle aged eyes!
I know black and other dark backgrounds are 'in' for the primitive look and all, but it is very difficult for a lot of people to read a dark page.
Also, your tutorial for the grubby jar would have been easier to follow if you had 'spaced' (like a separate paragraph) between each step. Again, it's probably a middle aged vision thing, but there ARE a lot of us middle ageed folks out here!
aj
Thanks so much for this neat tutorial! I love your blog! Karen from P&R
Jill,
I love you blog and saved it so i can read it often. It was very kind of you to give such a great tutorial. I appreciate it so much. I look forward to reading your blog often. God bless you!
Blessings, Linda :)
Thanks so much Jill for this wonderful tutorial!
Adding to my list of "To Do's"......I really LOVE the look!
Hugs and Blessings,
Wendy ~ Simply Cute Crafts
Post a Comment